| I got a little wrapped up with life and such . . . |
a "been-there" mom of six offers encouragement
to wives, young mothers, and those not so young,
and simple common-sense approaches to
the "ings" of life:
child-rearing (hints and helps), homemaking (all areas),
cooking (simple, cheap, and do-it-yourself)
making (toys and gifts), preparing (for the unexpected),
maintaining (sanity and peace in this increasingly crazy world) and more---
all aspects of making the most of making do on little---
and having fun in the process.
Saturday, August 31, 2013
Friday, August 23, 2013
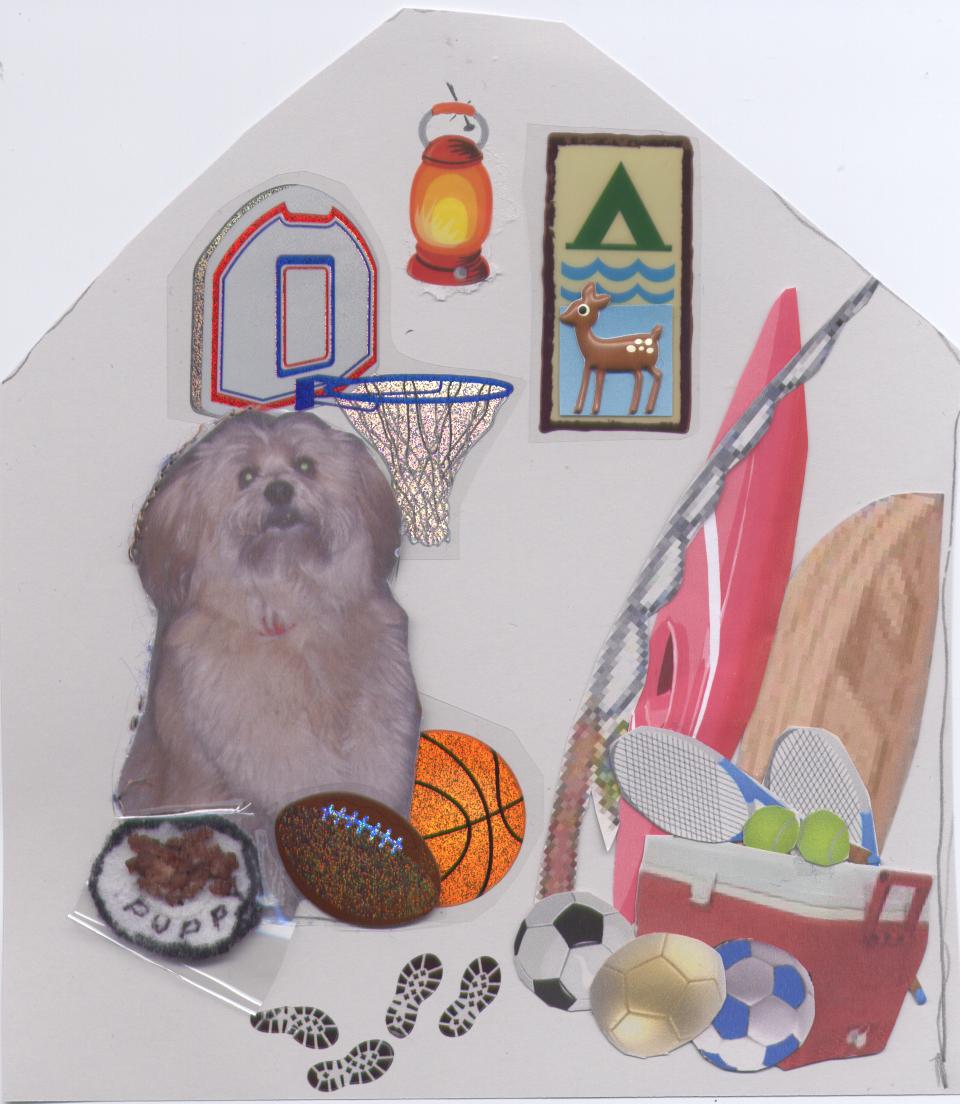
Quiet Book Page 5: Unzip the tent and find. . .
. . .things our kids and grandkids would take on a camping trip. Except, I forgot the Lacrosse sticks and the guitars!
Here are the steps I took:
1. Cut a tent out of felt. The section on the bottom was added because I goofed and had to make it longer. It worked out however, because the little extra length makes it easier to grasp and open the zipper.
The extra work of a tent window would not be necessary except a) I wanted to feature Puppy (explanation below the next photo) and b) I had a partial bolt of "screening-type" material I bought months for some unknown reason.
2. Made the tent interior on a piece of card stock or heavy paper. I use free computer clip art and stickers, sizing them, either larger or smaller, when necessary.
![]() |
| $ Note: the same Sticko brand stickers I pay $1.00 for at Wal-Mart cost $1.99 at JoAnn's. |
The photo of "Puppy" our shelter find is included in memory of him. He was three or four when we adopted him and he blessed our lives for 12 years. If you want to learn more about him, simply type Puppy in the upper left hand search box on my blog. You will learn how to make a dog coat from a 50 cent thrift shop pillow sham and more ---- 4 posts in all.
You can see Puppy's plate of food is enclosed in plastic. That is because I used cooked ground beef to get the look I was after!
3. Photo copy the completed layout and place it in a clear plastic page protector (or you could cover it with clear plastic contact paper or laminate it), basted around the edges because the plastic is slippery, and cut away the extra.
4. Securely sewed the zipper into the tent. To keep the zipper from slipping I took the time to hand sew it before machine stitching. I found it easiest to put the zipper in the one-piece tent and then slit the opening.
5. Placed the plastic-covered interior layout where I wanted it it on the felt page. Again I basted first, to keep it from slipping.
6. Added the foreground. I used a piece of sand paper for texture as the sand and topped it with felt grass. I just kind of wing it as I go.
I was really pleased how the zig-zag stitch connecting the sandpaper and the felt really gave it a well-groomed lawn look!
7. Positioned the tent over the interior and sewed around the sides and top.
8. I completed the page with a sticky back owl (which, of course, I sewed around for added security) and didn't do a very good job trying to put feet on it; some star-looking beads, and a glittering moon from a sheet of fancy stuff found in the felt square section of Hobby Lobby.
'til we stitch again,
I am, sometimes less simple than, Simply, Gail
4. Securely sewed the zipper into the tent. To keep the zipper from slipping I took the time to hand sew it before machine stitching. I found it easiest to put the zipper in the one-piece tent and then slit the opening.
5. Placed the plastic-covered interior layout where I wanted it it on the felt page. Again I basted first, to keep it from slipping.
6. Added the foreground. I used a piece of sand paper for texture as the sand and topped it with felt grass. I just kind of wing it as I go.
I was really pleased how the zig-zag stitch connecting the sandpaper and the felt really gave it a well-groomed lawn look!
7. Positioned the tent over the interior and sewed around the sides and top.
8. I completed the page with a sticky back owl (which, of course, I sewed around for added security) and didn't do a very good job trying to put feet on it; some star-looking beads, and a glittering moon from a sheet of fancy stuff found in the felt square section of Hobby Lobby.
![]() |
| I considered writing Whooo by the owl but I'd hate to overdooo it! |
'til we stitch again,
I am, sometimes less simple than, Simply, Gail
Tuesday, August 20, 2013
Holy Cow! Quiet Book Page 4 Mixes Things Up . . .
. . .if That's How They Choose to Play
Most quiet books have a matching page--usually shapes or colors.
I decided to mix things up a little bit.
I remember children's books from my past that had their pages cut horizontally in thirds, allowing you to turn the page sections individually creating crazy combinations.
I found the following example on line but couldn't get a clear photo of it. The links for the instructions and the templates are found below.
I wanted to do a variation of the flip book as a quiet book page ---- and I wanted to do animals.I was having a hard time finding similar size animals UNTIL I found this amazing (and free!) site.
There are 12 animals on this site. I especially love the crab but couldn't find a way to use him in this project. I tried, unsuccessfully, to draw the bodies on heavy Pellon. Finally I decided on basic felt bodies.
I used:
- simple shapes and stitches
- added different textures (yarn, sisal, embroidery thread) for the tails
- a couple of plastic self-sticking bee and butterfly embellishments from a $1.00 packet. I have mentioned before I don't trust the self-stick stuff so I sew over the top of them to make sure they are secure
I added:
- the banana when I discovered I cut the monkey's thumb on the wrong side of his hand
- a simple baby bird under the wing of the bird --- just because
- a movable trunk so the elephant can reach the bees
- the (a paperclip) bone because I had it and thought it was cute
- a plastic pocket in the center to hold the heads
![]() |
| I especially love the crab but couldn't find a way to use him in this project. |
![]() |
This one was labeled gray wolf but I altered him so he would look like Elliot, the Chihuahua. If I say so myself I think I did a pretty good job of it. You can compare my efforts by comparing this original with the one on the quiet book page below.
If you are really interested, you can check out the peek-a-boo page I posted at the same time as another copy-cat recipe --- Orange Julia.
When you peek-a-boo you can see the original Elliot (he is the one with the short hair. The long hair is son Luke)
http://thecreativecheapskate.blogspot.com/search?q=orange+julia |
I printed the animals on card stock, out out the heads and had them laminated. I learned that, at least in our area, most places that laminate no longer use the laminating pouches. The off-the-roll laminating process is great for large items but terrible (and possibly impossible) when you want to laminate a bunch of small items.
Staples, the office supply store, has both types and their pouches come in different thicknesses which is handy. I choose the heaviest which probably wasn't necessary. Since I am doing 12 books with six animals on a page it took three pouches. Again, I took the extra time to cut out the individual cardstock heads before laminating them because I wanted the "borders" around each head to be clear. If you look closely at the picture below you an see I didn't follow the lines when cutting out the plastic. Plus, you don't need to look close at all to see the pocket is crooked!
I wasn't sure what to use to back the heads so they would stick to the felt. I considered gluing rough sandpaper, using the rough side of sticky-back Velcro, and pieces of glued-on felt. I suggest testing what you choose to use to see how it works with the laminate---its reaction to glues and the strength of the bonds.
I am currently working on the template for a camping page ---- incorporating most of what I think would be included if all of the male (and yes, some of the female) members of our family were to stock the campsite. I was somewhat limited by what I could find to use in the time I had to search but you, and they, will get the
Friday, August 16, 2013
More Simple Ways to Travel "Unplugged"
. . . when there are miles to go and places to hopefully SEE as you pass through them.
Picking up where I last left off:
The mileage game and more . . .
and
Page 23 covers one-fourth of a page, leaving a lot of white space, so I'll just add it here:
are called Pelicans so much the better. The pocket on these clothes protectors stay in an open position making a great sandwich and French fry holder, as well as catching the crumbs and drips.
To break the boredom of fast food, we have allocated each family member a certain amount of money and then stopped at a large grocery store where there is a giant selection of items including dairy, deli, and bakery. Each person gets to pick what they want to eat. This can really be fun occasionally, especially if you allow them to choose exactly what they want---regardless of it's practicality or nutritional value.
Lastly,
Whenever you travel, wherever you travel, try not to let your destination be your only focus.
There is so much of interest and beauty to see when you take the time to enjoy the entire journey. Pointing out things of interest, beautiful examples of nature, and gorgeous sunsets will help your children appreciate their country and all of our Heavenly Father's creations. We never tire of such things. Hopefully we never will.
One night when our children were young we were taking one of their friends home and I pointed out the gorgeous moon. The little friend's comment, "I've seen it before." How sad is that!
Picking up where I last left off:
The mileage game and more . . .
and
are called Pelicans so much the better. The pocket on these clothes protectors stay in an open position making a great sandwich and French fry holder, as well as catching the crumbs and drips.
To break the boredom of fast food, we have allocated each family member a certain amount of money and then stopped at a large grocery store where there is a giant selection of items including dairy, deli, and bakery. Each person gets to pick what they want to eat. This can really be fun occasionally, especially if you allow them to choose exactly what they want---regardless of it's practicality or nutritional value.
Lastly,
Whenever you travel, wherever you travel, try not to let your destination be your only focus.
There is so much of interest and beauty to see when you take the time to enjoy the entire journey. Pointing out things of interest, beautiful examples of nature, and gorgeous sunsets will help your children appreciate their country and all of our Heavenly Father's creations. We never tire of such things. Hopefully we never will.
One night when our children were young we were taking one of their friends home and I pointed out the gorgeous moon. The little friend's comment, "I've seen it before." How sad is that!
Wednesday, August 14, 2013
Simple Travel Games for Kids that aren't "Plugged In"
"Are we there yet?"
Four of the most dreaded words in family travel!
At least that is the way it used to be.
If your family is consumed with all the electronic stuff available today, you may not hear that phrase as much, but if you are interested in traveling as an interacting family (in the car and with the passing landscape) the following ideas may give you an old-fashioned buzz.
Life was simpler back then ---- when being together meant exactly that. Sadly today, it too often means separate individuals doing their own thing ---- even when sitting next to each other in a confined space.
In my last post I promised some simple travel ideas to help families (who habitually tune one another out) tune in to each other and the areas where they are traveling. A unique way of traveling that somehow got lost along the way.
Just as it is unnecessary to "reinvent the wheel", it seems equally unnecessary to re-do the pages I wrote in my 2000 booklet Simply Keepin' 'em Busy about simple things kids and families can do and share while riding on those wheels.
Regarding the last item on the above page---our kids are appalled at the memory of doing that---but they all survived.
Next: Special activities and an auto survival kit for parents of the really young.
Stay tuned! The mileage game will show up this coming Friday in my next post . . . along with
Four of the most dreaded words in family travel!
At least that is the way it used to be.
If your family is consumed with all the electronic stuff available today, you may not hear that phrase as much, but if you are interested in traveling as an interacting family (in the car and with the passing landscape) the following ideas may give you an old-fashioned buzz.
Life was simpler back then ---- when being together meant exactly that. Sadly today, it too often means separate individuals doing their own thing ---- even when sitting next to each other in a confined space.
In my last post I promised some simple travel ideas to help families (who habitually tune one another out) tune in to each other and the areas where they are traveling. A unique way of traveling that somehow got lost along the way.
Just as it is unnecessary to "reinvent the wheel", it seems equally unnecessary to re-do the pages I wrote in my 2000 booklet Simply Keepin' 'em Busy about simple things kids and families can do and share while riding on those wheels.
Regarding the last item on the above page---our kids are appalled at the memory of doing that---but they all survived.
Next: Special activities and an auto survival kit for parents of the really young.
Stay tuned! The mileage game will show up this coming Friday in my next post . . . along with
- Racing Alphabet
- Letters Game
- Name That Truck
Plus more sanity savers for breaking the monotony of eating and motel-ing on your way to "there."
Just in time for the last holiday of summer! But not the last chance to try something new.
Tuesday, August 6, 2013
Personal Electronics Complicate While Simplifying Our Lives
Back in the day ---- not even too far back ---- times were simpler. Far simpler.

Back in the day we even had to wait for our coffee to perk and our popcorn to pop over high heat on a stove.
We knew what it meant to have to wait for something --- as there was no other option.
We understood patience --- as there was no other option.
Young people today may not even know what patience is! Our own kids tell us we would know more of what was going on with their families if we would receive text messages or join Facebook. To let you know how unlikely that is:
A couple of months ago we turned in our almost 12 year-old cell phones for new ones. The employees laughed at our antiques. We wanted the most basic model they still carried. They refer to them as "flip phones" and dug out a couple. We returned to the store when we discovered we were missing our user instructions. They laughed again and said they they were not missing, only were no longer included.
Fortunately we have the patience to wait until one of our grandchildren comes over --- as that is our best option!
Dave was employed by the Church of Jesus Christ of Latter-day Saints (Mormon) in the early 70s. The Church installed their first computer system shortly after. It took up most of the space in its own large, climate controlled building ---- and didn't have anything near the capabilities of today's I-phone or Smart phone or whatever they are called.
Whatever information required research and time, even 10 years ago, is available today in an instant, right in your pocket. Exciting and often invaluable but . . .
While we know these things are progress, admittedly unbelievable and amazing progress, we also know the dangers they can elicit and the things that are lost along with this progress.
We shudder to think of the challenges parents face in regulating and monitoring (besides keeping up with and paying for) all of today's electronic "necessities."
The following is the introduction to a recent newspaper column by Tiffany Gee Lewis:
On a recent family road trip, a little bantering began about five minutes down the highway.
“Mom, can I play your iPhone?”
“No, not right now.”
A pause.
“Dad, can I play your iPad?”
“No, not right now.”
“How about your iPhone?”
“No.”
“In five minutes?”
“No.”
And so it went. For three hours. While we encouraged our kids to read books, stare out the window and, for goodness sakes, just look for the ocean over the crest of the hill, they pestered us about absolutely needing to update their Minecraft account.
Tiffany continues: "I’ve heard frustration from countless parents who feel they are on the losing end. They can’t seem to get a handle on when and how to let their kids have access to electronics. As this particular war isn’t going away any time soon, here are six ways to fight the good fight."
Tiffany is the young mother of four sons. She has some great suggestions and encouragement.You can read her entire article
iCharge: 6 Ways to Control Family Media
at thetiffanywindow.wordpress.com.
My next post will feature some of the non-electronic road trip games our children played back in their day.
- Telephones were attached to a long cord and we had to be home to answer it.
- Home-delivered newspapers and movie theater news reels brought us the news.
- Books consisted of paper pages that you turned one at a time.
- We watched favorite television shows by scheduling our time so we would be at home at their scheduled time.
- We wrote letters in cursive, or typed them using a typewriter. . . and mailed them.
- We found our information for school assignments at the local library and in encyclopedias.
- If we wanted to be "naughty" we looked up words in Webster's Dictionary or poured over the underwear sections of the Sears Roebuck catalog.
Back in the day we even had to wait for our coffee to perk and our popcorn to pop over high heat on a stove.
We knew what it meant to have to wait for something --- as there was no other option.
We understood patience --- as there was no other option.
Young people today may not even know what patience is! Our own kids tell us we would know more of what was going on with their families if we would receive text messages or join Facebook. To let you know how unlikely that is:
A couple of months ago we turned in our almost 12 year-old cell phones for new ones. The employees laughed at our antiques. We wanted the most basic model they still carried. They refer to them as "flip phones" and dug out a couple. We returned to the store when we discovered we were missing our user instructions. They laughed again and said they they were not missing, only were no longer included.
Fortunately we have the patience to wait until one of our grandchildren comes over --- as that is our best option!
Dave was employed by the Church of Jesus Christ of Latter-day Saints (Mormon) in the early 70s. The Church installed their first computer system shortly after. It took up most of the space in its own large, climate controlled building ---- and didn't have anything near the capabilities of today's I-phone or Smart phone or whatever they are called.
Whatever information required research and time, even 10 years ago, is available today in an instant, right in your pocket. Exciting and often invaluable but . . .
While we know these things are progress, admittedly unbelievable and amazing progress, we also know the dangers they can elicit and the things that are lost along with this progress.
We shudder to think of the challenges parents face in regulating and monitoring (besides keeping up with and paying for) all of today's electronic "necessities."
The following is the introduction to a recent newspaper column by Tiffany Gee Lewis:
On a recent family road trip, a little bantering began about five minutes down the highway.
“Mom, can I play your iPhone?”
“No, not right now.”
A pause.
“Dad, can I play your iPad?”
“No, not right now.”
“How about your iPhone?”
“No.”
“In five minutes?”
“No.”
And so it went. For three hours. While we encouraged our kids to read books, stare out the window and, for goodness sakes, just look for the ocean over the crest of the hill, they pestered us about absolutely needing to update their Minecraft account.
Tiffany continues: "I’ve heard frustration from countless parents who feel they are on the losing end. They can’t seem to get a handle on when and how to let their kids have access to electronics. As this particular war isn’t going away any time soon, here are six ways to fight the good fight."
iCharge: 6 Ways to Control Family Media
at thetiffanywindow.wordpress.com.
Friday, August 2, 2013
When Life Defrosts Your Freezer . . .
While hurrying to leave for a short trip this past week, I grabbed a last minute item from the freezer and left the door ajar. Ooops!
It could have been a lot worse!!!
This freezer (we have two) sits on carpet in the office. When we bought the second one I debated as to whether I should try to divide our frozen items equally in case something happened to one or the other.
Fortunately I decided that would complicate keeping track of things and I like to keep things as simple as possible.
This freezer holds mainly fruits, fruit butters, juices, nuts, baggies of pebble ice, bottles of water and and a gallon of milk
They were thawed but still cool. My first stop was Internet searches on their safety and usability.
Restoring . . .
Since we eat very little meat, there was very little to throw out. I did have a package of thin beef, waiting for me to try my hand at dehydrating it into jerky. It was still in its original packaging and that package was in a plastic grocery bag so I didn't give it much thought as I went to dump it in the trash. I should have. The trash can was two feet from the freezer and the package spilled its bloody meat juice. It almost made me sick --- and definitely made me panic.
While I was frantically searching the Internet for protein/blood-based stain removal, Dave calmly got a couple of bath towels and a spray bottle of clear water. Five minutes later, I was still searching and. . .
Dave was finishing up.
There was not a single trace remaining. (Pessimist that I am, I was sure the stain would reappear when the carpet dried---along with an accompanying, and probably horrible, smell.)
Dave was a Church custodian for many years and learned this from a fellow professional. The first thing to realize in the removal of spills is to remember that the difference between a spot and a stain is TIME. Tackled immediately most spills will come up completely with water.
1. Blot up as much of the spill as you can with cloth toweling.
2. Generously spray water on the spill and let it sit for two or three minutes.
3. Blot up with more cloth toweling.
4. Repeat process as needed.
Dave did this three times. There is no stain and no odor!
Preserving . . .
I moved the bottles of juices and apple butters to the refrigerator. Neither has made us sick.
Same with the milk but later tossed it because of how it looked. It didn't smell bad but it was full of clumps that did not dissolve when shaken. Probably milk is so processed that it isn't possible for it to spoil in the real sense of the word but I wasn't going to take any chances.
I made several loaves of banana bread and froze those we did not eat immediately.
I let the grapes, pomegranate seeds, and a few things like that refreeze. I haven't checked them out yet.
One of my biggest concerns was the 10 pounds of crushed raspberries I had frozen to make raspberry-peach jam when the peaches were plentiful and therefore---cheap. Thankfully I had separated the berries into recipe amounts and heat-sealed the bags. Only one, that I had already opened and lazily closed with a rubber band, leaked onto the floor and a door shelf of the freezer but not onto the carpet.
Fortunately the peaches aren't cheap enough yet. Why would I say fortunately? Didn't I mean unfortunately? Nope!
We still had quarts of peaches that we had bottled two and three years ago, allowing me to "kill two birds" without the work of having to remove any of the stones---or peach skin!
and Raspberry-Peach Jam
While I love the raspberry-peach jam recipe I have used for years,
http://thecreativecheapskate.blogspot.com/2011/08/making-jam-with-sweet-juicy-ripe.html
I was never overly excited about the package of jello it required and I don't like the thought of packaged pectin or its price. So, this time around I used another recipe I found on the Internet. It is great --- just like my grandma used to make it. It thickens by cooking "down" so you get less but without commercial pectin or "cow hoof" jello.
It is from Patricia Larsen on a Taste of Home site. It took first place at her local county fair. Her basic recipe is given here with my comments in green. You can check out her readers' comments by clicking below---they include using Splenda in place of sugar.
http://www.tasteofhome.com/recipes/raspberry-peach-jam
You should probably do as they say and not as I do
Current information for jams and jellies, as has always been with all fruits, is to process the bottles in a water bath for about 15 minutes. I ignored this advise. While I have always processed all fruits in a water bath, for 45 years I have followed the old practice of pouring the boiling jam into hot sterilized jars, sealing them immediately with lids and rings, and turning them upside down on a folded bath towel. When I turn them upright they have always sealed. And have never molded.
Possibly modern research has discovered this NEED to also process the jams and jellies but sometimes "modern" is based on overreaction and/or over-the-top and unnecessary caution (maybe because of an isolated case caused by an sloppily un-sterilized jar or . . . worry of a lawsuit.)
When we returned 2-1/2 days later . . .
![]() |
| The difference between a spot and a stain is time. Check out this amazing (and amazingly simple) way to clean up spills on carpet |
This freezer (we have two) sits on carpet in the office. When we bought the second one I debated as to whether I should try to divide our frozen items equally in case something happened to one or the other.
Fortunately I decided that would complicate keeping track of things and I like to keep things as simple as possible.
This freezer holds mainly fruits, fruit butters, juices, nuts, baggies of pebble ice, bottles of water and and a gallon of milk
They were thawed but still cool. My first stop was Internet searches on their safety and usability.
Restoring . . .
Since we eat very little meat, there was very little to throw out. I did have a package of thin beef, waiting for me to try my hand at dehydrating it into jerky. It was still in its original packaging and that package was in a plastic grocery bag so I didn't give it much thought as I went to dump it in the trash. I should have. The trash can was two feet from the freezer and the package spilled its bloody meat juice. It almost made me sick --- and definitely made me panic.
While I was frantically searching the Internet for protein/blood-based stain removal, Dave calmly got a couple of bath towels and a spray bottle of clear water. Five minutes later, I was still searching and. . .
Dave was finishing up.
There was not a single trace remaining. (Pessimist that I am, I was sure the stain would reappear when the carpet dried---along with an accompanying, and probably horrible, smell.)
Dave was a Church custodian for many years and learned this from a fellow professional. The first thing to realize in the removal of spills is to remember that the difference between a spot and a stain is TIME. Tackled immediately most spills will come up completely with water.
1. Blot up as much of the spill as you can with cloth toweling.
2. Generously spray water on the spill and let it sit for two or three minutes.
3. Blot up with more cloth toweling.
4. Repeat process as needed.
Dave did this three times. There is no stain and no odor!
Preserving . . .
I moved the bottles of juices and apple butters to the refrigerator. Neither has made us sick.
Same with the milk but later tossed it because of how it looked. It didn't smell bad but it was full of clumps that did not dissolve when shaken. Probably milk is so processed that it isn't possible for it to spoil in the real sense of the word but I wasn't going to take any chances.
I made several loaves of banana bread and froze those we did not eat immediately.
I let the grapes, pomegranate seeds, and a few things like that refreeze. I haven't checked them out yet.
One of my biggest concerns was the 10 pounds of crushed raspberries I had frozen to make raspberry-peach jam when the peaches were plentiful and therefore---cheap. Thankfully I had separated the berries into recipe amounts and heat-sealed the bags. Only one, that I had already opened and lazily closed with a rubber band, leaked onto the floor and a door shelf of the freezer but not onto the carpet.
Fortunately the peaches aren't cheap enough yet. Why would I say fortunately? Didn't I mean unfortunately? Nope!
We still had quarts of peaches that we had bottled two and three years ago, allowing me to "kill two birds" without the work of having to remove any of the stones---or peach skin!
and Raspberry-Peach Jam
While I love the raspberry-peach jam recipe I have used for years,
http://thecreativecheapskate.blogspot.com/2011/08/making-jam-with-sweet-juicy-ripe.html
I was never overly excited about the package of jello it required and I don't like the thought of packaged pectin or its price. So, this time around I used another recipe I found on the Internet. It is great --- just like my grandma used to make it. It thickens by cooking "down" so you get less but without commercial pectin or "cow hoof" jello.
It is from Patricia Larsen on a Taste of Home site. It took first place at her local county fair. Her basic recipe is given here with my comments in green. You can check out her readers' comments by clicking below---they include using Splenda in place of sugar.
http://www.tasteofhome.com/recipes/raspberry-peach-jam
- 2-2/3 cups finely chopped peeled peaches (that amounted to just under two quarts, after draining them and quickly blending them)
- 1-1/2 cups crushed raspberries
- 3 cups sugar
- 1-1/2 teaspoons lemon juice
Directions
- In a Dutch oven, combine all ingredients. (I used a stock pot and while the ingredients were only a few inches deep it still splattered out during the boiling and stirring time.) Cook over low heat, stirring occasionally, until sugar has dissolved and mixture is bubbly, about 10 minutes. Bring to a full rolling boil; boil for 15 minutes, stirring constantly. Remove from the heat; skim off foam. (for some reason I didn't have foam with any of the batches I made.)
- Carefully ladle hot mixture into hot half-pint jars, leaving 1/4-in. head-space. Remove air bubbles, wipe rims and adjust lids. Process for 15 minutes in a boiling-water canner. Note: add 1 minute to the processing time for each 1,000 feet of additional altitude over 1,000 feet. Yield: 5 half-pints.(I used pint jars which averaged out to four half-pints)
You should probably do as they say and not as I do
Current information for jams and jellies, as has always been with all fruits, is to process the bottles in a water bath for about 15 minutes. I ignored this advise. While I have always processed all fruits in a water bath, for 45 years I have followed the old practice of pouring the boiling jam into hot sterilized jars, sealing them immediately with lids and rings, and turning them upside down on a folded bath towel. When I turn them upright they have always sealed. And have never molded.
Possibly modern research has discovered this NEED to also process the jams and jellies but sometimes "modern" is based on overreaction and/or over-the-top and unnecessary caution (maybe because of an isolated case caused by an sloppily un-sterilized jar or . . . worry of a lawsuit.)
Subscribe to:
Posts (Atom)