a "been-there" mom of six offers encouragement
to wives, young mothers, and those not so young,
and simple common-sense approaches to
the "ings" of life:
child-rearing (hints and helps), homemaking (all areas),
cooking (simple, cheap, and do-it-yourself)
making (toys and gifts), preparing (for the unexpected),
maintaining (sanity and peace in this increasingly crazy world) and more---
all aspects of making the most of making do on little---
and having fun in the process.

Friday, September 27, 2013

On Halloween you can "Play it Safe with a Corn Syrup Face"

As forerunners to the topic I need want to make two comments:

Earlier this week I was at a fabric craft store and observed a family with three young children purchasing a gaudy and gauzy short dress witch costume, and what I think was witch hair,  for the girl who looked to be about five.  They also had what I'd guess  to be about two yards of a print fabric.  I know it is none of my business but I, admittedly the cheapskate,  was appalled to hear the total price ---- $42. and some change!!!  (I don't know if they used the common percentage off coupons that this store is famous for or not).

Also earlier this week, I was going through some of my files when I happened on the following page torn, literally, from a 1987 women's magazine.  If you are trying to imagine what my files, and stacks- that-haven't- made it-to-files-yet , look like and, if you are a good imagine-r you may be right.


A juxtaposition I couldn't resist!

A creative face paint I must admit I haven't tried!

And directions I am putting  in readable type so you won't have to search for the correct back issue in your stash!

Directions:
Combine 3 Tablespoons corn starch and 1 Tablespoon flour. Gradually stir in 3/4 cup light corn syrup and 1/4 cups water. Set aside 1/4 cup of mixture. Divide the remaining mixture into small cups adding 1/2 teaspoon food color for each desired color.

1. Apply the untinted mixture to face. Avoid eyelids and the area around eyes.
2. Cover with one-ply white tissue. Apply more untinted mixture. Let dry 15 minutes.
3. Mix red and yellow food color to make orange mixture; paint on cheeks, forehead.
4. Mix red and green to make black. Add tiger markings. Wash off with soap and water

Note: I am copying this exactly as it is printed. It is probably safe to assume that it means
to use soap and water when you are ready to wash it off!!!.

For a devil: Repeat steps 1&2 above. Then use black mixture for a moustache and eyebrows, red for devilish cheeks.

For a clown: Repeat steps 1&2 above. Then pain colorful mouth, cheeks and eyebrows.

In closing:
While this is intriguing, I am not sure even I would feel it's worth the effort. My sister (and probably others behind my back) occasionally often say there is such a thing as me being too cheap.

Still, without being too cheap, I am sure you can find many quite suitable costumes for much less money.


Friday, September 20, 2013

Quiet Book Page 6 --- Open the Barn to Find . . .

Five Farm Animal Finger Puppets and more 


There are many variations of barn pages on the Internet.  I checked several out and adapted what fit my likes and abilities. 

Here is my barn page and a few things I did to make the process easier. 

I'm making 12 of these and am pretty sure  I got some of the windows even!
Hopefully the little users won't notice or won't care ---- and their parents may find it
either charming or . . .  indicative of my declining years and eyesight. 

I found a picture for my laying hen, colored it, and machine stitched a plastic window (cut from a zip lock bag) around it. 

As I have indicated with other pages, I like to add texture and things to feel whenever I can.   


When you "open" the hay you find three eggs.  

I sew my objects on using one of three things: dental floss, fishing line or heavy button thread so there is no chance of anything coming loose that could create a swallowing hazard. 

The eggs are threaded on fishing line. 
The barn door latches are coat hook and eyes, sewn on with button thread.

Catching Rays is not just a suntanning term!

I cut four pieces of fleece and crisscrossed them for the sun's rays.
I overcast the sun, catching the rays at the same time. The unintended pluses were depth to the sun and loose rays that move.

When you open the barn door five farm animals are there 
to greet you.

The chicken is usually in the pen also, but I wanted to show it's details---cut out with
pinking shears, with the stitching following the lines of the body leaving the wings open.

The finger puppet patterns are also found on line---from very simple to very elaborate. Mine are variations of some of them.  For me, the hardest part was deciding on the right size. I didn't know how to make copies of the available free patterns so they came out the correct size so I had to judge the best I could. 

Except for the chicken (who has added wings) all of my puppets are the same shape. All are the same size --- about 1-1/2 inches wide and 2-1/4 inches long.

The cow is cut from a cow print piece of felt (that was on sale for
10 cents and happily was enough for all 12 of my cows!)  If you don't have cow felt you can just sew a couple of spots on white felt. 

The sheep is from a scrap of fleece I had on hand.

I used tiny  beads for most of the eyes and noses. 

The pig's snout is embroidered French knots. 

This vial probably holds close to a zillion beads and cost less than $2.00 at Wal-Mart. 

The biggest sanity and time saver, for me, was creating
one-piece ears for the animals.  Cutting out tiny individual ears and managing to sew them on was way too much for me.  Although my drawings  are rough I hope they will give you the idea of what I did. 


I admit some of my pages are a little lot more elaborate than most of my offerings but sometimes I get carried away.  I know I am going overboard on these future great grand-kid gifts but I am having fun.

Please don't panic and feel that Simply, Gail has abandoned her simplicity and simply gone even more crazy.  I promise I haven't. 

Simple quiet book pages will provide every bit as much fun. Trust me when I say the ones I made for our kids when they were small were very basic. Our future great-grand-kids won't need all this ---- but for some reason, at this time in my life, I do. 


Friday, September 13, 2013

Better to be Safe than Sorry ---


In April I posted an article on the importance of respecting our "gut feelings" ---- even if we feel foolish doing so. Here is an excerpt from that post.

The following is from the book "The Gift of Fear---Survival signals that protect us from violence" by Gavin De Becker.

“...what many others want to dismiss as a coincidence or a gut feeling is in fact a cognitive process, faster than we recognize and far different from the familiar step-by-step thinking we rely on so willingly. We think conscious thought is somehow better, when in fact, intuition is soaring flight compared to the plodding of logic. Nature’s greatest accomplishment, the human brain, is never more efficient or invested than when its host is at risk. Then, intuition is catapulted to another level entirely, a height at which it can accurately be called graceful, even miraculous. 

"Intuition is the journey from A to Z without stopping at any other letter along the way. It is knowing without knowing why. 

“...the root of the word intuition, tuere, means ‘to guard, to protect.’”


You may want to read it or even re-read it.

http://thecreativecheapskate.blogspot.com/search?q=fear

I got to take my own advice last week while we were on a trip.

It was mid-day and we had just made a potty stop at a large travel center. It appeared that I was the only one in the restroom and I went to the last stall --- the furthest from the entry. 

For some reason, sitting there, I glanced down and noticed a pair of black combat-type boots in the stall next to me. They were pointing straight ahead, right in front of that toilet. There were no sounds nor movement.  It didn't feel right although thinking anything else, in a busy place in the middle of the day, seemed crazy.

I decided  it was important I push logic behind and follow my gut feeling.

I carefully prepared for a very quick exit while going through what I hoped sounded like the routine of a regular exit.  I left, almost at a run, and without any stops.

I will never know what might have been but I have no regrets for taking the precautions steps I did. All my senses told me it wasn't a good situation.  

As I went over it, from the safety of our car, the more frightening it seemed.  Wouldn't it be logical, if someone was really in there to use the facility, and was sitting as the boot placement seemed to indicate, there would have been other things showing besides the boots---like a skirt hem or pants?  Unless the person was wearing shorts. I had never seen combat boots worn with shorts before.  

Did you notice I used had rather than have in the above sentence. A few days later, while visiting a tourist attraction, we saw one woman wearing shorts and black combat boots and later, another in brown ones --- again wearing shorts!

Even after seeing those, I don't feel foolish although . . .

I am old enough to think the combat boot/shorts combo looks foolish . .  .

And I will continue to follow any intuition, guidance, gut feeling that comes my way, even if the logical side of me feels embarrassed or foolish.

I am Simply, Gail and I'd rather be safe than sorry; better paranoid than dead!


Friday, September 6, 2013

Goin' Bananas for this Simple Nutty Treat


Peanut Butter, Bananas, and Chocolate ----- these yummy triplets compliment each other in many different concoctions!


If you haven't tried this one, I highly recommend it. It is quicker to make them than it is to read HOW to make them!


  •  Slice ripe but still firm bananas in slices about 1/2 inch thick.  Top every other slice with a small glop of peanut butter (plain or chunky---your choice) and top with another slice of banana, pressing down slightly.


  • Place each "sandwich" on a cookie sheet covered with a sheet of waxed or parchment paper.


  • Freeze.


  • Melt chocolate almond bark or other dipping chocolate in a microwave, following package directions. Be very careful to not overheat or get any moisture in the chocolate.
  • Drop frozen "sandwiches" one at a time into melted chocolate. Use a fork to turn it until completely covered., Lift it out using the fork and gently tap the fork on the side of the bowl, letting extra chocolate drip back. 
  • Return to cookie sheet; sprinkle with a little sea salt or finely chopped peanuts if desired. Repeat. 
  • Return filled cookie sheet to freezer. When frozen transfer the treats  to a zip-lock bag, store in freezer, and remove as needed  wanted.

Note:  Have you ever had a problem with socks disappearing in the dryer? I am having the same problem with these little goodies disappearing somewhere, somehow, sometime, between the second freezing and the packaging.

'til we eat again,
     I am Simply, Gail


Saturday, August 31, 2013

Bear with Me . . . Pleeeeze


I got a little wrapped up with life and such . . .

the time just flew . . .
and I got a little (okay a lot) behind!

If you ever find yourself in that situation here are a couple of quick, simple and yummy recipes that may bail you out---just like they did me.

Jerk Chicken and Black Beans --- 
 a hearty soup that is ready to eat almost before you are!

Combine one can of Campbell's new Chunky Jammin' Jerk Chicken with Rice and Beans OR their Fajita Soup with Rice and Beans AND one un-drained can S&W Cuban Recipe Black Beans (with onions, peppers and cumin). Heat and then, if there is a little time, allow it to simmer until you are ready for it.

Serve it in bowls and top with coarsely broken tortilla chips and sour cream as desired.

You can also use a can of plain black beans if you choose. These should be drained before adding to the chunky soup.

Leftovers are also good the second day in a flour tortilla. 

Orange Cream --- 
brings back childhood memories of a vanilla ice cream bar encased in orange Popsicle stuff. It is great either as a refreshing salad or a light dessert.

Gently combine one 8 ounce carton of frozen non-dairy topping (thawed) with one 6 or 8 ounce carton vanilla yogurt.  Gently fold in the dry mix from a small( 4-serving size) package* of orange gelatin. You can eat it right away but it is best chilled for a short while in the refrigerator.

The last time I made this, at the suggestion of Barb the friend who gave me the recipe, I only used one-half to 2/3rds (just estimated--didn't measure) of the packet and it was plenty. 

sd105109_hol09_single_cookie.jpg

There is obviously no need to point out that Simply, Gail is no Martha Stewart (which I consider a compliment) but when I happened across her site above showing how to creatively wrap singular things up I thought it fit the two separate things I have to wrap up this post. (I apologize for the run-on sentence!)

1.  Time is probably going to continue to fly for the next month or so, so---I will by posting once a week for a while---probably on Fridays.

2.  When I started to write this post, being a little behind took me back 33 years. Our youngest son just started school and I just started to work those same hours outside the home. For the first time ever, I entered a contest. It was December 1980. The rules were how to creatively say, in 30 words or less, why I deserved a $1,000 wardrobe of my choosing from a local dress shop.

I used a long strip of adding machine tape* and using magazine cut-outs I made a telegram** type picture-gram basically explaining how I was returning to the workforce with a full life, a great husband, and six wonderful children but(t) a very bare wardrobe---using the little Miss Coppertone illustration. 

I rolled it up, stuck it in the top of a small Santa boot and mailed it off.

I guess it was pretty risque for it's day and when the winner was announced on the radio, the moderator said that while the entire presentation was clever the closing line/illustration was the deciding factor!!


* a narrow roll of paper, like today's rare but simple (rare as they are) cash register receipt, that printed out the numbers you typed in a machine you worked by pulling a handle, without the benefit of  any batteries, wires, plugs. The original meaning of "wireless" I guess!

** a document sent to deliver an urgent message to someone some distance away. Somehow each word was typed out individually by a special operator on a special machine who somehow sent it over the telephone wires to another special telephone operator (and their special machine) in the area where it was to be delivered. 

A telegram was a miracle means of contact for very important occasions/messages. We received one from New York 50 years ago on our wedding day in California ---not really that long ago in the overall scheme of things, but seeming light years away when trying to describe then with now's  technology.


Next, each word was printed out individually on really, really narrow slips of paper (kind of like the shreds of today, pasted in order on a sheet of paper and given to another person who
 immediately hand-delivered it to the recipient.


According to another long ago ad slogan ---- 
"we've come a long way, baby."


Friday, August 23, 2013

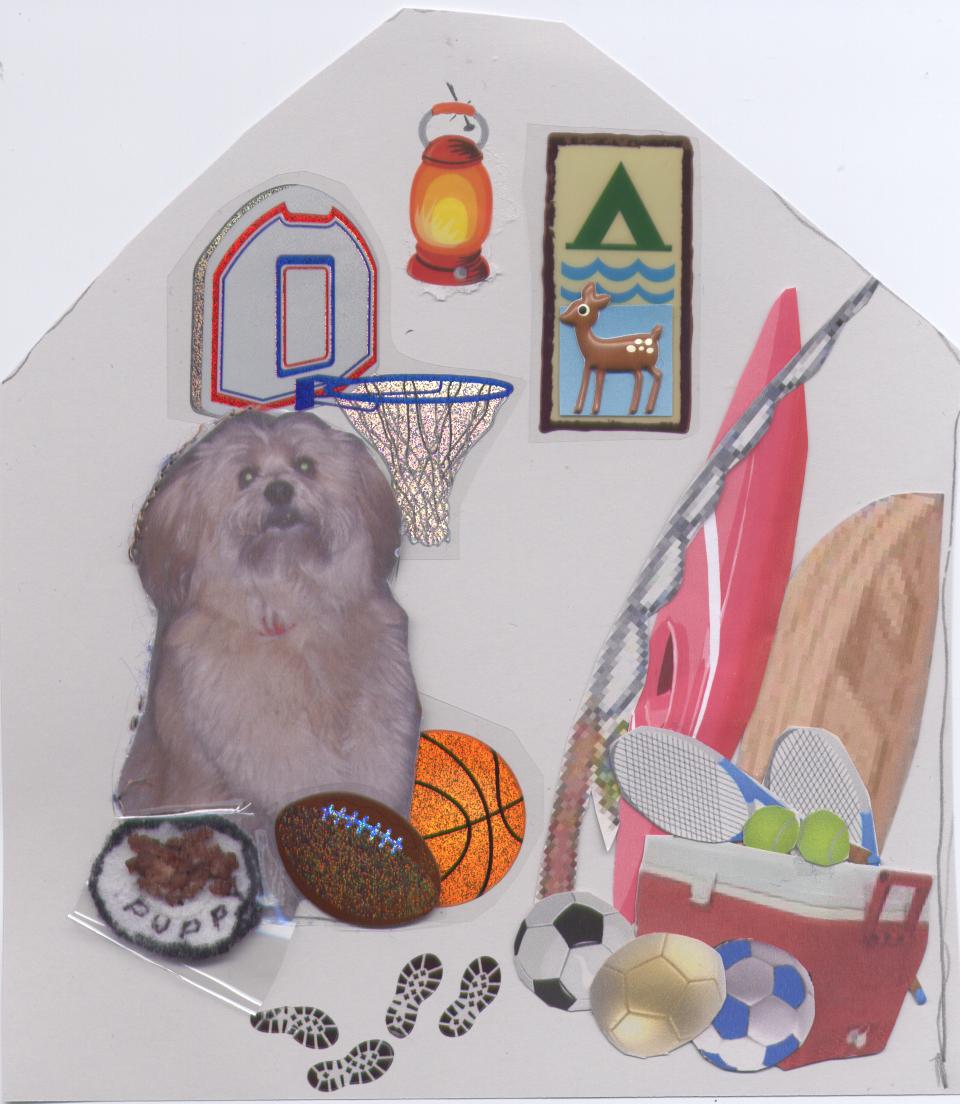
Quiet Book Page 5: Unzip the tent and find. . .


. . .things our kids and grandkids would take on a camping trip. Except, I forgot the Lacrosse sticks and the guitars!

Here are the steps I took:

1. Cut a tent out of felt. The section on the bottom was added because I goofed and had to make it longer. It worked out however, because the little extra length makes it easier to grasp and open the zipper. 

The extra work of a tent window would not be necessary except a) I wanted to feature Puppy (explanation below the next photo) and b) I had a partial bolt of  "screening-type" material I bought months for some unknown reason.

2. Made the tent interior on a piece of card stock or heavy paper.  I use free computer clip art and stickers, sizing them, either larger or smaller, when necessary.


$ Note: the  same Sticko brand stickers I pay $1.00 for at
Wal-Mart cost $1.99 at JoAnn's.


The photo of "Puppy" our shelter find  is included in memory of him. He was three or four when we adopted him and he blessed our lives for 12 years. If you want to learn more about him, simply type Puppy in the upper left hand search box  on my blog. You will learn how to make a dog coat  from a 50 cent thrift shop pillow sham and more ---- 4 posts in all.

You can see Puppy's plate of food is enclosed in plastic. That is because I used cooked ground beef to get the look  I was after!

3. Photo copy  the completed layout and place it in a clear plastic page protector (or you could cover it with clear plastic contact paper or laminate it), basted around the edges because the plastic is slippery, and cut away the extra.

4. Securely sewed the zipper into the tent. To keep the zipper from slipping I took the time to hand sew it before machine stitching. I found it easiest to put the zipper in the one-piece tent and then slit the opening.

5. Placed the plastic-covered interior layout where I wanted it  it on the felt page.  Again I basted first, to keep it from slipping.

6. Added the foreground. I used a piece of sand paper for texture as the sand and topped it with felt grass.  I just kind of wing it as I go.

I was really pleased how the zig-zag stitch connecting the sandpaper and the felt really gave it a well-groomed lawn look!

7. Positioned the tent over the interior and sewed around the sides and top.

8.  I completed the page with a sticky back owl (which, of course, I sewed around for added security) and didn't do a very good job trying to put feet on it; some star-looking beads, and a glittering moon from a sheet of fancy stuff found in the felt square section of Hobby Lobby. 


I considered writing Whooo by the owl but
I'd hate to overdooo it!

'til we stitch again,
      I am, sometimes less simple than, Simply, Gail


Tuesday, August 20, 2013

Holy Cow! Quiet Book Page 4 Mixes Things Up . . .

            . . .if That's How They Choose to Play


Most quiet books have a matching page--usually shapes or colors.
I decided to mix things up a little bit.

I remember children's books from my past that had their pages cut horizontally in thirds, allowing you to turn the page sections individually creating crazy combinations. 

I found the following example on line but couldn't get a clear photo of it.  The links for the instructions and the templates are found below.


I wanted to do a variation of the flip book as a quiet book page ---- and I wanted to do animals.I was having a hard time finding similar size animals UNTIL I found this amazing (and free!)  site. 


There are 12 animals on this site.  I especially love the crab but couldn't find a way to use him in this project. I tried, unsuccessfully, to draw the bodies on heavy Pellon.  Finally I decided on basic felt bodies. 

I used:
  • simple shapes and stitches
  • added different textures (yarn, sisal, embroidery thread) for the tails
  • a couple of plastic self-sticking bee and butterfly embellishments from a $1.00 packet. I have mentioned before I don't trust the self-stick stuff so I sew over the top of them to make sure they are secure
I added:
  • the banana when I discovered I cut the monkey's thumb on the wrong side of his hand
  • a simple baby bird under the wing of the bird --- just because
  • a movable trunk so the elephant can reach the bees 
  • the (a  paperclip) bone because I had it and thought it was cute
  • a plastic pocket in the center to hold the heads


animal clipart crab
I especially love the crab but couldn't find a way to use him in this project.
animal clipart wolf
This one was labeled gray wolf but I altered him so he would look like Elliot, the Chihuahua. If I say so myself I think I did a pretty good job of it. You can compare my efforts by comparing this original with the one on the quiet book page below.  

If you are really interested, you can check out the peek-a-boo page I posted at the same time as another  copy-cat   recipe ---  Orange Julia. 

When you peek-a-boo you can see the original Elliot (he is the one with the short hair.  The long hair is son Luke)

http://thecreativecheapskate.blogspot.com/search?q=orange+julia


I printed the animals on card stock, out out the heads and had them laminated. I learned that, at least in our area, most places that laminate no longer use the laminating pouches. The off-the-roll laminating process is great for large items but terrible (and possibly impossible) when you want to laminate a bunch of small items. 

Staples, the office supply store, has both types and their pouches come in different thicknesses which is handy. I choose the heaviest which probably wasn't necessary.  Since I am doing 12 books with six animals on a page it took three pouches.  Again, I took the extra time to cut out the individual cardstock heads before laminating them because I wanted the "borders" around each head to be clear.  If you look closely at the picture below you an see I didn't follow the lines when cutting out the plastic. Plus, you don't need to look close at all to see the pocket is crooked!

I wasn't sure what to use to back the heads so they would stick to the felt.  I considered gluing rough sandpaper, using the rough side of sticky-back Velcro, and pieces of glued-on felt.  I suggest testing what you choose to use to see how it works with the laminate---its reaction to glues and the strength of the bonds. 


I am currently working on the template for a camping page ---- incorporating most of what I think would be  included if all of the male (and yes, some of the female) members of our family were to stock the campsite.  I was somewhat limited by what I could find to use in the time I had to search but you, and they, will get the stitcher picture.